In Part 2 of our Getting Started with Ruby on Rails series, we will go ahead and add some authentication so that only the admin of the blog can manage articles and the associated categories.
You can find Part 1 here.
To get us up and running quickly, we are going to use a well-established ruby gem called Devise from Plataformatec. Have a look at Devise on Github for more information – https://github.com/plataformatec/devise
OK lets go ahead and start coding. The first thing we need to do as with any ruby gems is add it to the gemfile in the root of our rails application.
gem 'devise'
Now your gemfile should look a little like below :
source 'https://rubygems.org'
gem 'rails', '3.2.8'
# Bundle edge Rails instead:
# gem 'rails', :git => 'git://github.com/rails/rails.git'
gem 'sqlite3'
gem 'json'
gem 'devise'
# Gems used only for assets and not required
# in production environments by default.
group :assets do
gem 'sass-rails',   '~> 3.2.3'
gem 'coffee-rails', '~> 3.2.1'
# See https://github.com/sstephenson/execjs#readme for more supported runtimes
# gem 'therubyracer', :platforms => :ruby
gem 'uglifier', '>= 1.0.3'
end
gem 'jquery-rails'
Now we need to install the Devise gem by running the bundle install command from within terminal. Once you have run the Bundle Install command we can go about setting it up. To do so we firstly need to run the install command within terminal to get the necessary files loaded within the Blog project.
rails generate devise:install
This will return the following message letting you know what has been created along with example code to get you up and running quickly.
create  config/initializers/devise.rb
create  config/locales/devise.en.yml
===========================================================================
Some setup you must do manually if you haven't yet:

1. Ensure you have defined default url options in your environments files. Here is an example of default_url_options appropriate for a development environment

in config/environments/development.rb:
config.action_mailer.default_url_options = { :host => 'localhost:3000' }

In production, :host should be set to the actual host of your application.

2. Ensure you have defined root_url to *something* in your config/routes.rb.

For example:
root :to => "home#index"

3. Ensure you have flash messages in app/views/layouts/application.html.erb.

For example:
<p class="notice"><%= notice %></p>
<p class="alert"><%= alert %></p>

4. If you are deploying Rails 3.1+ on Heroku, you may want to set:

config.assets.initialize_on_precompile = false

On config/application.rb forcing your application to not access the DB or load models when precompiling your assets.

5. You can copy Devise views (for customization) to your app by running:

rails g devise:views

===========================================================================
The only snippet we are going to use from the previous example code generated by devise is adding the flash messages to the application template (/app/views/layouts/application.html.erb)
Add the following code to the file so it looks like this:
<!DOCTYPE html>
<html>
<head>
<title>Blog</title>
<%= stylesheet_link_tag    "application", :media => "all" %>
<%= javascript_include_tag "application" %>
<%= csrf_meta_tags %>
</head>
<body>
<p class="notice"><%= notice %></p>
<p class="alert"><%= alert %></p>
<%= yield %>
</body>
</html>
The next thing to do is to generate the devise views. This will allow us to change the presentation of the login form when we come to front-ending the site in a later episode.
From terminal run the following command:
rails g devise:views
As you can see in terminal, the command issued returns the following message notifying you that the following files have been created within the blog application:
invoke  Devise::Generators::SharedViewsGenerator
create    app/views/devise/shared
create    app/views/devise/shared/_links.erb
invoke  form_for
create    app/views/devise/confirmations
create    app/views/devise/confirmations/new.html.erb
create    app/views/devise/passwords
create    app/views/devise/passwords/edit.html.erb
create    app/views/devise/passwords/new.html.erb
create    app/views/devise/registrations
create    app/views/devise/registrations/edit.html.erb
create    app/views/devise/registrations/new.html.erb
create    app/views/devise/sessions
create    app/views/devise/sessions/new.html.erb
create    app/views/devise/unlocks
create    app/views/devise/unlocks/new.html.erb
invoke  erb
create    app/views/devise/mailer
create    app/views/devise/mailer/confirmation_instructions.html.erb
create    app/views/devise/mailer/reset_password_instructions.html.erb
create    app/views/devise/mailer/unlock_instructions.html.erb
The next thing we want to do is generate the logic for the login authentication by typing in the following command within terminal:
rails generate devise admin
Note: The word admin in the last command is telling devise to basically create a system for the admin user. We could have just used the word user or any other if you wanted. All we are telling devise here is to associate the word admin in this particular instance.
Rails now lets you know what has been created from the previous command:
invoke  active_record
create    db/migrate/20130121120914_devise_create_admins.rb
create    app/models/admin.rb
invoke    test_unit
create      test/unit/admin_test.rb
create      test/fixtures/admins.yml
insert    app/models/admin.rb
route  devise_for :admins
We now need to migrate the database as devise has added a table for the authentication.
rake db:migrate
Right, now that the database has been migrated, lets add some code to the application.html.erb file to allow us to sign up, login and log out of the application:
<div>
<% if admin_signed_in? %>
you are logged in as <%= current_admin.email %>. Not you?
<%= link_to "log out", destroy_admin_session_path, :method => :delete %>
<% else %>
<%= link_to "Sign up", new_admin_registration_path %> or <%= link_to "Log in", new_admin_session_path %>
<% end %>
</div>
Now lets start up the webserver by running rails server from terminal.
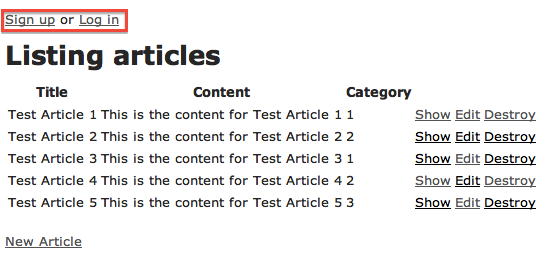
Once the server is up and running then open up a browser and navigate to http://localhost:3000. You should now see the following:
We now have a means of signing up and logging in to the application.
Now click on the sign up link and sign up using any email and password you want, for this example and to login to the live demo I am using you@example.com as an email address and test12345 ass the password.
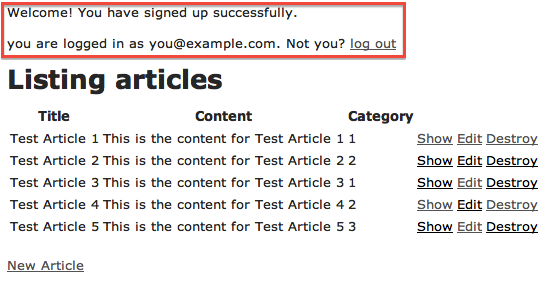
Once you have signed up you will now see that you are signed up and logged in as in the screen shot below:
It is now very important at this point to change the Admin Model (app/models/admin.rb) so that nobody else can signup to your application and carryout administrative duties. To do this we need to delete the :registerable from this file.
class Admin < ActiveRecord::Base
# Include default devise modules. Others available are:
# :token_authenticatable, :confirmable,
# :lockable, :timeoutable and :omniauthable
devise :database_authenticatable, <span style="text-decoration: line-through;">:registerable,
</span>:recoverable, :rememberable, :trackable, :validatable
# Setup accessible (or protected) attributes for your model
attr_accessible :email, :password, :password_confirmation, :remember_me
# attr_accessible :title, :body
end
Additionally we can now delete the link to signup in the application.html.erb template in the views/layouts folder.
<div>
<% if admin_signed_in? %>
you are logged in as <%= current_admin.email %>. Not you?
<%= link_to "log out", destroy_admin_session_path, :method => :delete %>
<% else %>
<span style="text-decoration: line-through;"><%= link_to "Sign up", new_admin_registration_path %> or</span> <%= link_to "Log in", new_admin_session_path %>
<% end %>
</div>
Now restart the server and check that the changes have applied to our blog application.
We are now going to add something called a before filter to our articles and categories controllers that stops the create, update and destroy actions being carried out unless an admin user is logged in, to do this open up “app/controllers/articles.rb & categories.rb” and add the following line above the index action (def index).
before_filter :authenticate_admin!, except: [:index, :show]
This line is basically banning users from anything other than the index and show actions of the controller.
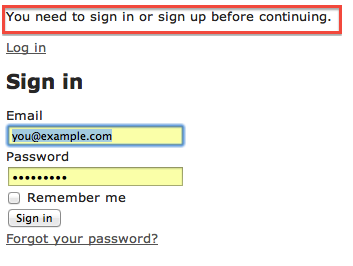
Restart the server and make sure you are logged out as the session may still have you as logged in and try clicking on the edit link of the articles index page. This should direct you to the login page and display the following:
Now login using the credentials you chose when signing up and you should be able to edit the page.
Having followed this tutorial you have covered the basics of Devise authentication. Devise can do a lot more than the basics that we have covered so I recommend you take a look at the following links if you want to expand beyond the basics we have covered.
Recommended Reading:
https://github.com/plataformatec/devise
https://github.com/plataformatec/devise/wiki
http://railscasts.com/episodes/209-introducing-devise
http://railscasts.com/episodes/210-customizing-devise
About Robbie Done
Robbie Done is a British Web Developer. He is an experienced Software Developer, with over 2 decades of industry exposure.


Pingback: Getting Started With Ruby on Rails | Part 1 of Series - Mr. Geek()