I feel I’ve come late to the party. But they say, it’s never too late. Laravel’s community has matured and it’s safe to say the framework has brought the sexy back to PHP. Laravel is dead simple. It’s expressive, elegant, and extremely powerful at the same time.
CRUD operations are the core of any web application. We create, read, update and delete records. With Laravel, your life is sorted. Trust me on this one. Laravel makes CRUD dead simple. I’ll walk you through the process by creating a small non-fancy CRUD application in just 5 minutes.
Requirements
Please ensure that you have the following components sorted before we begin.
- Composer (latest preferable)
- PHP 5.5.*
- MySQL
- Mcrypt extension
- Hopefully you’ll have your Terminal open.
Once you have these ready, turn ON your MySQL database. Let’s roll.
Creating your Laravel Project
Creating your first Laravel project is easy. Let’s create an app called lara.
composer create-project laravel/laravel lara
We then serve the app using PHP’s built-in server.
php artisan serve
Browse to localhost:8000 and you should see the Laravel logo.
CRUD Overview
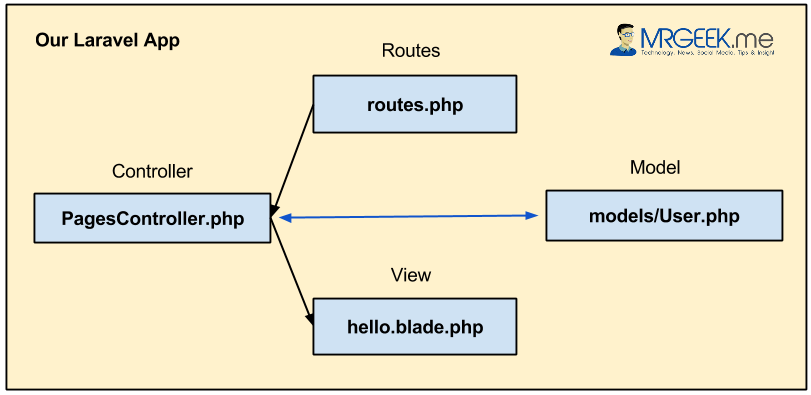
Here’s a nice diagram of what we’re trying to achieve.
You must already be familiar with the MVC design pattern. If not, brush up here. The idea is very much linked to the underlying software design principle of SoC (Separation of Concerns). Each software component does it’s own thing without knowing much about each other. This way, you can scale faster, the code becomes easier to refactor and you begin to appreciate OOP. Laravel excels in all these departments. It just works.
What are we building
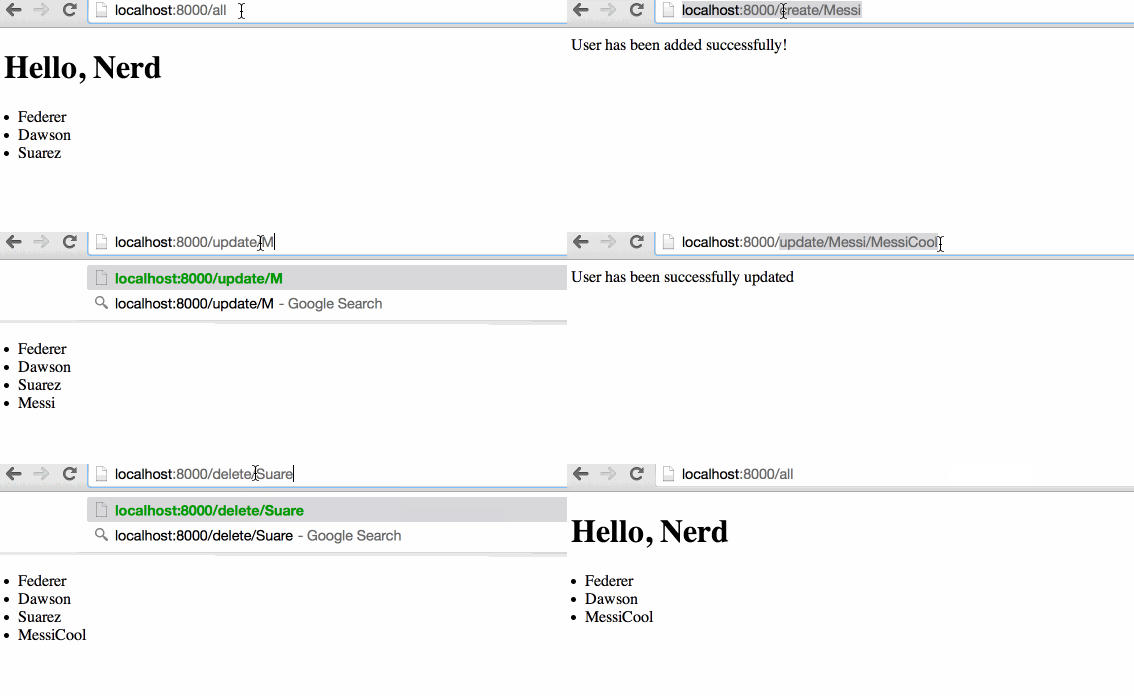
For this tutorial, I’ll be showing you how to perform basic CRUD operations using the MVC design pattern using Laravel’s Eloquent ORM. Here is a GIF image of how the end product will appear. I know, not too fancy, but that’s what you can achieve in just 5 minutes with Laravel. I think that’s “pretty darn amazing” (Jeffrey Way says that a lot, check out Laracasts.com).
- We use a RESTful style URI to pick up names via URI segments.
- We Create, Delete, Update and Show the records via URIs.
- Make sure you’ve your database tables created and config plugged in.
In case you don’t have your database setup, I’m using MySQL and Sequel Pro (on a Mac). The database configuration files reside in app/config/database.php, where you can edit the details for your database driver. For MySQL, this starts from line 55.
Routes.php
Situated within the /app directory, you have routes.php. The routes.php file acts as a router, routing the user from one place to another, as URIs are changed. Put it simply, the routes.php file takes in registrations of the URIs your Laravel app should listen to, and helps you define what actions to perform. It’s more like a listener. Here’s our routes.php file.
<?php
Route::get('/create/{username}', 'PagesController@create');
Route::get('/delete/{username}', 'PagesController@delete');
Route::get('/update/{username}/{new}', 'PagesController@update');
Route::get('/all', 'PagesController@all');
Routes::get() takes in two arguments, namely the URI and the action. You can also append variables to the URI like {username}. This ensures that the username variable is passed onto the controller function defined in the second argument. Quite simple, isn’t it?. The motivation for registering your routes in the routes.php file might confuse some coming from the CodeIgniter world, where it’s more like app.com/controller/function.
In Laravel, security is of paramount importance, so auto-mapping of controller functions into routes isn’t safe per se. Hence, we must register our routes explicitly in the routes.php file when we need them. As for the second argument, the action can be defined by using ControllerName@functionName. This is evident from our sample code that powers our basic CRUD application.
PagesController.php
Our controller, PagesController.php is responsible for handling and coordinating everything. The controller brings everything together. The username variable received from the URI is directly available to us in our controller’s functions. Let’s look at some code. At first, all our controllers must extend the BaseController class. The remaining of the code within the Controller must live within these brackets.
<?php
class PagesController extends BaseController
{
}
If you remember from the GIF animation earlier, we performed CRUD operations via four URI verbs. These four verbs are translated as controller functions, as all(), create(), delete() and update(). I like to do it this way as a matter of convention, but you can do it otherwise. Here’s some code.
all()
public function all()
 {
 $data = User::all()->lists('username');
 return View::make('hello')->with('data',$data);
 }
The all() function exists in our PagesController.php file. All it does is display the records in our database and pass that data to the view. The User class is the model, placed in models/User.php. We can use the static function provided to us by the Eloquent ORM and retrieve all the records from the table ‘users’ defined in our User model. The ->lists(‘username’) ensures we retrieve the username column only. Think of it as a filter.
We then return the data into the view as an array. How simple is that? It’s pure expressiveness, and of course, elegance. Now, it’s worth looking at the view file called hello.blade.php. Blade is a templating engine that ships with Laravel. To make it work, add .blade after your view file name. Here’s our view file called ‘hello’.
<!doctype html>
<html>
<head>
 <meta charset="utf-8">
</head>
<body>
<h1> Hello, Nerd </h1>
<p>
 @foreach ($data as $value)
 <li>{{ $value }}</li>
 @endforeach
</p>
</body>
</html>
The Blade engine allows us to write more expressive PHP within our views. For looping, we simply throw around @foreach and then the customary PHP code follows. After that, we add an <li> element and use Blade’s special handlebars {{ … }} syntax to pop in our variable $value. It can’t get any better! Now, let’s look at rest of the functions in our PagesController.php.
public function create($username)
 {
 $user = new User();
 $put = $user->createUser($username);
 if ($put) {
 return "User has been added successfully!";
 }
 }
public function delete($username)
 {
 $user = new User();
 $delete = $user->deleteUser($username);
 if ($delete) {
 return "User has been deleted successfully!";
 }
 }
public function update($username, $new)
 {
$user = new User();
 $update = $user->updateUser($username, $new);
 if ($update) {
 return "User has been successfully updated";
 }
 }
At first, appreciate that Laravel is automatically receiving the URI segments from our routes.php file and populating them into the controller as variables. For our create, delete and update functions, we have our variables available to us instantly. The functions have repeatable patterns, so it is worthwhile looking at just one to get the idea.
We create a new User() object instance and assign it to a variable $user. Once done, we can talk to the User and send data over to the User model. If you know PHP, I am hoping you know what’s going on. We interface with the functions in the User model using ->. I think it’s time to show you User.php, our cute little model.
<?php
use Illuminate\Auth\UserTrait;
use Illuminate\Auth\UserInterface;
use Illuminate\Auth\Reminders\RemindableTrait;
use Illuminate\Auth\Reminders\RemindableInterface;
class User extends Eloquent implements UserInterface, RemindableInterface
{
public $timestamps = false;
use UserTrait, RemindableTrait;
/**
 * The database table used by the model.
 *
 * @var string
 */
 protected $table = 'users';
/**
 * The attributes excluded from the model's JSON form.
 *
 * @var array
 */
 protected $hidden = array('password', 'remember_token');
public function createUser($username)
 {
$user = new User();
 $user->username = $username;
 $user->password = Hash::make('1234');
if ($user->save()) {
 return true;
 };
 }
public function deleteUser($username)
 {
$user = User::where('username', '=', $username);
if ($user->delete()) {
 return true;
 };
}
public function updateUser($username, $new) {
$user = User::where('username','=',$username)->first();
 $user->username = $new;
if($user->save()) {
 return true;
 }
 }

}
Witness Laravel’s Eloquent ORM at work – so darn expressive. You create a new User object, and access the column in the ‘users’ table by simply doing $user->username and set a new username by assigning a variable like $user->username = $username. Freaking easy. The rest is plain old PHP which I am sure you are very well versed with.
Ending Remarks
If you remove the use lines at the top, do not implement the two interfaces, and comment out line 9 and 15, the whole thing will still work. There are two reasons for this. The first: our example is so simple that it doesn’t need the intricate details of the framework yet. But what about line 15.
How does Laravel still know our table is called ‘users’? Well, it simply assumes it. Since the model is named User, the table must be called ‘users’. It’s a convention thing and it would only work if you name your tables with respect to how your models are named. Subtle magic there nonetheless!
Hope you enjoyed the tutorial. Stay tuned, subscribe and comment if you want more! By the way, here’s the code on Github.
About Ali Gajani
Hi. I am Ali Gajani. I started Mr. Geek in early 2012 as a result of my growing enthusiasm and passion for technology. I love sharing my knowledge and helping out the community by creating useful, engaging and compelling content. If you want to write for Mr. Geek, just PM me on my Facebook profile.


